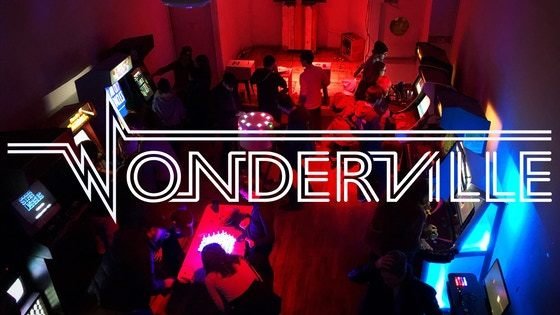
A new bar and event space celebrating independently made arcade games in Brooklyn
Latest Updates from Our Project:
YOU DID IT!!! 858 of you helped us launch Wonderville! THANK YOU!!!
about 7 years ago
– Wed, Apr 03, 2019 at 10:59:41 PM
You did it, you like us, you really like us! OMG!
858 of you pledged $100,835 to help bring this project to life. And since we met both our stretch goal (to build a pico-8 and for renovations to the backyard), you'll all soon be able to come and party in the sunlight outside and then bring it in during the moonlight to party inside!
Thank you for taking this journey with us. Thank you for putting your trust in us. Thank you for helping create a home for independent video game developers and the people who enjoy their games. Thank you for showing everyone that this matters and it's worth fighting for. Thank you.
What happens next...
Well, we'll probably breath into a paper bag for a few hours until we calm down. After that, it's on to doing this thing, and doing it right!
We’ll be in touch in about 10 days with some surveys for the rewards. Why 10 days? It takes about that much time for Kickstarter to verify and release the funds to us, so we want to do this in the right order and avoid hiccups for everyone.
Your surveys will confirm your funds and your reward. We're using BackerKit to fulfill rewards and we'll follow up with details on this process (it's super easy) soon. It's basically a "store" that allows you to add more shwag to your reward tier if you're interested. For those of you that pledged above your reward tier, this is where you'll be able to decide how to allocate those funds towards other rewards. This is also where you'll select which of the three T-Shirt designs you would like. As well as where you'll have a chance to add on a second or third shirt, or any other reward that you may choose to add on.
Once we have our final tallies for how many Wonderbundles, T-shirts, pins and more to send out, we'll jump into production and work to get them out to all of you!
Get involved
We are hosting a general meeting at Secret Project Robot (the future home of Wonderville) on April 14th at 1 pm. 1186 Broadway, Brooklyn, NY 11221. During this meeting, we'll discuss some of our plans for Wonderville and ways in which you can help us get ready for the grand opening, if you so choose.
Upcoming events!
Now that we've been funded, we are starting to get our ducks in a row by planning out the events we'll be hosting. We're excited to announce Tournament Tuesdays (1186 Broadway, Brooklyn, NY 11221). Here are the first 4 we have scheduled. These events will give you a sample of what we have in store. We'll still be renovating and sprucing the place up during this time, but who says we can't have a few friends over before we officially takeover the space?
April 8th: TISWATIS On Monday April 8th, Death By Audio Arcade and WithFriends are proud to welcome City Collective Amsterdam (CCA) to Secret Project Robot! CCA is a recently formed open collective made up of a new generation of makers with diverse cultural backgrounds who carry a strong artistic reputation.
April 10th:The Sun Never Sets On Caketopia This will be Secret Project Robot's final art installation and we are working on something special for it. Because we love SPR and Erik and Rachel, and we're so honored they asked, we had to think something really special. You don't want to miss this one!
April 11th:Wonderville: A Talk from Death By Audio Arcade at NYU Game Center Mark Kleback, co-founder of Death By Audio Arcade, and Andy Wallace, board member and creator of Particle Mace, will give a talk on Death By Audio Arcade, cabinet making, and Wonderville.
Keeping in touch
Our updates here will become less frequent, but don't worry, we're still checking in every so often to see if anyone posted any new comments or has a question for us. We're going ot aim to update here at least once a month, but we'll be way more active on our social media feeds over at Twitter and Instagram. So hit us up anytime! Plus, we'll continue to monitor #WondervilleNYC, so there's lots of way to ping us.
We are beyond floored at how many folks came out to support #WondervilleNYC. From Kickstarter backers, to testimonial creators, to folks making games in support of us... we still have no words! For now: we love you! Stay tuned for more updates and for all the exciting events soon!
From your friends at Team #WondervilleNYC
We're doing an AMA today! Also, a few thoughts about our logo.
about 7 years ago
– Tue, Apr 02, 2019 at 01:16:18 PM
It's the final countdown!
We're less than 24 hours away from ending our campaign and what a wild ride it has been. You guys crushed the Pico-8 stretch goal and we're super close to reaching our backyard renovation stretch goal as well!
Thank you to all of you, we can't wait to show you what you helped create.
We're doing a Reddit AMA today at 2pm!
Our arcade build write up last week ended up making the rounds on social media and was posted to Reddit, people seemed genuinely excited about trying to build one themselves. So we decided, why not continue the show and tell and answer everyone's questions?
Hope to see you there! The page is live now if you want to throw in any of your burning questions. Let's party together!
How we made our amazing logo!
After our last update providing some behind the scenes on how we build our arcade cabinets, we wanted to give you a different insight into something we’re super pumped about— the Wonderville logo!
Isn't she a buet?
The logo was created by Chris Hernandez. He’s a badass graphic designer, art director, and game designer. He's been a part of Death by Audio Arcade since it was first starting so naturally everyone knew he’d be helping Wonderville start of right as well. In addition to DBAA projects he has worked on Crystal Brawl, Nika and Super Rad Raygun. He also works in advertising so he can pay his rent.
Over the weekend, we sat down with Chris to learn more about how he created the logo.
What follows is a summary of our chat.
Shaminder: How did you get started with design? What mediums do you work in?
Chris: Depends where exactly when you want to start. I used to draw all the time as a kid, I loved MS Paint, and I had a class in high school that introduced me to Photoshop, where we just went through one of those ‘classroom in a book’ things.
In college, I started out in engineering, but after my first year, I started comparing art classes to engineering classes, and just kind of felt like I was way more excited by stuff like typography and illustration than I was about fluid dynamics and more calculus. Although in retrospect, I do wish I’d been able to do engineering and art side-by-side, since it’s extremely relevant to a lot of what we do now. But at the time, the idea that you could actually have a career doing art and design seemed amazing, and we all assumed we were going to get rich and famous making concert posters and album covers, etc.
For me - I’m almost exclusively digital these days. A pencil and paper are good for sketching, but usually those ideas go right into Photoshop or Illustrator, depending on the needs. I’m trying to get back into some more physical media these days when I have the time though!
Early paper sketches for the Wonderville logo.
S: How did you come to work with the DBAA crew and Mark and Steph on the concept for the logo?
C: I worked on one of the first arcade cabinets we built as DBAA. Before it really even had a name in fact. When we actually decided to form a cohesive thing around all the cabinets we were building, I was sort of the obvious choice, since everybody else is much more specialized in electrical components, programming, and that sort of thing. When we decided to start Wonderville, I don’t think there was ever really much of a question that I’d be doing some logo and branding work.
I don’t know if we ever even discussed it beyond a "hey I’m doing this right?” in our slack channel.
S: Where do you start with logo design? For Wonderville, how did you come to settle on an idea?
C: Well, first thing is the name. We spent about a month kicking around ideas in a chat channel with everyone in the org, brainstorming and doing spreadsheets and all that. Once we settled on Wonderville, the first step is to just start doodling the name.
How does it look in all caps? How about mixed case? Do we Capitalize the W and the V, or maybe just use those letters as a kind of lockup. A big thing was that Mark really wanted to do something that had a neon sign look - so that drove a lot of the early concepting as well.
Experiments in creating a neon look.
S: When it comes to color and typography, how did you settle on the final design?
C: Since we were going with the neon-look, we kind of narrowed our type options down pretty early on. We were definitely thinking of some sort of retro-50’s type thing for a while, and looked at a lot of hand drawn script type fonts -
The thing with those is that they take a lot of time and polish to get right, and the people that can really knock those out have usually been doing it for years. The typeface we ended up using is based on Gil Sans - I would normally never do that double stroke inline look, but for mimicking a kind of retro neon look, I think it works in this case. And it has the advantage of being a really well fleshed out set of fonts, so we can carry that type through things other than the logo when we need to.
The colors were a whole other thing. I looked at the biggest game and interactive art organizations I can think of: Kotaku, Polygon, Indiecade, Babycastles, Juegos Rancheros, and kind of mapped their colors onto a color wheel. Then we look at where they’re not. Which is a pretty common thing that ad/branding agencies do.
From there, you start experimenting with value and color combos until you find something that’s right. Since we’re a bar, I thought it made sense to have some deeper darker colors to use as a base, and then we could accent that with some really bright pops of pink and blue, that are a little more common in the ‘games and tech’ stuff that other people do.
I’ve got a whole mental thing in my head about how we’ve got a burgundy color that’s associated with the ‘bar’ side of the space, and a teal that’s associated with the ‘gallery’ side, but I’ll have to actually sort those thoughts out into some sort of full on expanded style guide at some point.
Getting closer.
S: Did you have to alter your workflow or change your approach, knowing this logo may be used on screens and not just print or websites?
C: The typeface is 100% chosen for it’s translatability into a glowing neon sign, for sure, and that translates pretty well onto a screen. A lot of our photography is dark rooms with hits of bright lights, so it was definitely important to have something that works as a pure white overlay on that type of photography. Going forward, I’m also going to have to develop versions of everything that work as small icon sizes, and since we’re a video game bar. We’re gonna need pixel art versions of everything too!
S: What makes for a good design?
C: Haha, that’s a big question! But mainly, it’s thinking about what the purpose of something is. That goes for game design, industrial design, urban planning, everything.
Form follows function and all that, although as weird game designers, the fun part is sometimes making the ‘function’ as weird as possible, to get some goofy-ass forms, I guess.
But yeah, thinking about the viewer or users experience, and making sure that they’re seeing what you want them to see.
S: Who do you admire in the design world? What inspires your work?
C: I don’t follow a ton of graphic design work, because well, a lot of times, that’s a job, and it’s dictated largely by what clients will let you get away with.
That said, I think that Cory Schmitz has made a lot of my favorite logos of the past several years, and Olly Moss is someone I go back to a lot. Also, I’m a big fan of traditional 2d animation, and it’s hard to overstate the importance of Rebecca Sugar there. I also don’t know who did the side art of the Centipede arcade cabinet, but that is one of my favorite illustrations of all time, despite the fact that it gave me nightmares as a kid.
These days I genuinely think I’m most inspired by the people I work with through DBAA though. And the other designers and artists in the NYC scene.
For real, just look at the list of games on our site, the devs in the Wonderbundle, the tshirt designs for the Kickstarter and you’ll see an amazing variety of work, different styles, different technology. It actually takes some discipline not to get sidetracked and start a new project every time you get inspired by someone else’s work!
S: I want to wrap up by asking something a little off the wall. What’s a question no one ever asks that you wish someone would ask?
C: Oh, probably some sort of deeply technical question about how to build complex photoshop files with lots of linked assets and animation frames, where you write custom scripts to export everything with the right file names. That or like, asking me for a detailed explanation of how a state machine works in one of my games, or how I solved some collision detection issue.
Everybody who’s doing creative work is always solving dozens of little detailed problems like that in really clever ways that are almost impossible to explain in normal conversation, but they make you feel like a damn genius when you figure them out. I would actually love to do a show and tell like that, where everybody gets a chance to explain how they solved some weird little problem in a clever way, and hang on cause it’s gonna take half an hour to explain everything!
S: Half hour you say, perhaps we need to do some more updates?
C: If the people want to learn, just tell me when to show up!
STRETCH GOALS UNLOCKED! (Also, we made our goal!!!!!)
about 7 years ago
– Fri, Mar 29, 2019 at 12:20:16 PM
After years of anticipation, on Thursday March 28, 2019, at 8:04 pm, EST, Wonderville was welcomed into the world!
A pledge of $10,000, claiming a reward of a full size arcade cabinet, helped give Wonderville the final push it needed. Over 730 backers like you helped get us to this moment!
You are incredible! Thanks to you we’re funded and Brooklyn is getting a new arcade bar! We can’t wait to have all of you at Wonderville!
Keep following us here for updates, hit us up on social and come see us in Brooklyn soon!
Upon entering the world, Wonderville also brought along a message: FEED ME!
That can only mean one thing, y'all crazy fools just unlocked the stretch goal expansion pack!
If we can hit $85,000, we'll be able to build a two-player PICO-8 arcade machine—hand-made and painted by a local artist!
For those not familiar, PICO-8 is a fantasy, retro console in the style of the Commodore 64. It’s a lot of fun to make small games in and a lot of our community has done just that! With this arcade we’ll be able to rotate what’s on display showcasing different locally made PICO-8 games in all of their 128x128 glory!
As of now, we're less than $5000 away from this target, can we clear it today?! Help us spread the word, please, and this time tomorrow, we could be updating everyone that this is happening!
This next one is a big one, it's something we figured we wouldn't be able to do until later, but with your support, if we can hit $100,000 total, we'll be able to accelerate our plans to renovate the backyard, creating an outdoor space for hanging out, gaming and events!
Currently, the backyard has a cabana in need of repair and there is some space being underutilized.
By meeting this goal, we'll be able to give Wonderville's backyard a scrub down, repair the cabana, add new outdoor seating, a new awning, restore some of the existing artwork and add a new outdoor mural, make upgrades to outdoor lighting and create a weather-proofed covered space for a rotating selection of arcade games.
Help up knock down these targets and unlock more stretch goals! Also, we're open to suggestions for future goals, we want the community to be a part of shaping Wonderville with us, use #WondervilleNYC to let us know what the next stretch goal should be!
Reward updates
All of our early birds are gone, but there's still time to claim a Wonderbundle, t-shirt, pins or a spot in our workshops!
At 4am today, someone from France claimed a Line Wobbler reward. That means we only have 1 left!
The original console for Powerboat Italia 88 is still available, limited to 1 of 1, this is your chance to own a part of Wonderville history.
And a reminder for anyone wondering how to claim more than one t-shirt or add on other rewards, all you need to do is up your pledge by the amount of additional rewards you want. After this Kickstarter ends, you'll receive an e-mail that asks you which t-shirt you want and how you would like to divy up any remaining funds for other rewards.
Event tonight!
And we wanted to send a reminder about tonight's fundraiser gathering at Elsewhere at 6pm.
We're all meeting IRL again, to play some games and raise a ruckus in Brooklyn! Greenpoint Elsewhere Loft is hosting a fundraiser for Wonderville and you're all invited! Did we mention it's free? It's free yo!
Hope to see you all there, we're nearly there and we owe it all to you!
Bonus, a dog!
And finally, it's been a while since we had another arcade pet drop in on us. Today, meet Daisy, who was very suspicious of the new Bleep Space arcade machine Andy Wallace was building.
Have a pet who loves video games? We'd love to see it! Comment here, or post on Instagram or Twitter using #WondervilleNYC and we may just re-share it to all our followers or in a future update! Let's have some fun people!
How to make an arcade cabinet, we're building KungFu Kickball!
about 7 years ago
– Thu, Mar 28, 2019 at 08:51:25 PM
For today's update, we wanted to take a moment to share some behind the scenes on how we build our arcade games. If you've ever been to a past exhibit we've hosted, either at the Smithsonian, MagFest or in a residency at a local NYC venue, you may not have realized it, but the arcade cabinet you were pounding on, shoulder checking your buddy against or stealing (seriously, why?) were all designed, cut, built and painted right here in and near Brooklyn!
That's right, we not only support local devs and make all our own games, we also build the units that house them, and subsequently repair them (seriously, why would you steal?).
So today, on a very special update, let's take a look at How it's Made, Wonderville edition!
Before we begin, if you hate to read, don't worry, we got you covered! It's not an exact 1:1 with this write up, but click here for a video of a panel we held at MAGFest2019 on how to build your own arcade.
Now, away we go! We're going to take a look at Jonah Wallerstein's KungFu Kickball, which was built by Kyle Magocs and Mark Kleeb last December. This build is unique, as it was built in two parts, with Mark building the console (the part with the buttons and joysticks) in NYC and Kyle building the rest of the cabinet in Pittsburgh.
Step 1: Clear up your day, pur a cup your favorite non-alcoholic beverage (gotta stay sharp) and grab your tools.
Step 2: Draft your plans, you can use software (we like SketchUp) or paper and pen, but this step is crucial if you want to make sure your build goes right without a lot of wasted time, money and sanity.
"You can skip it, but you'll save yourself a hell of a headache by getting things squared out up front," says Kyle.
One the left is a SketchUp render of KungFu Kickball, and on the right is a breakdown of each part which will be used to cut wood to spec.
Step 3: Now that you have your renders and measurements, it's time to source your wood. Plywood is sturdy and affordable.
Kyle headed over to the hardware store for the build, a couple of 1x1 pine and some plywood.
Step 4: Bring your wood home, set up your space and get to cutting.
Take it from Kyle, "SAFETY FIRST (or at least like second or third) wear some f'n safety glasses, ya f'n turkey!"
When you're all done, you should have a pile of perfectly cut wood ready to assemble. Also, notice the large space to work in, you're gonna want to do this project in a garage, backyard or other large space.
For the sides, reference your draft drawing and start with drawing out the side profile and making sure it makes sense before any cuts. The resulting cut, on the right, can just be flipped over to hide all your measurement marks for a clean look.
For the second side, stack your cut board on top of the uncut, clamp them together and what we’re going to do is use a router with a flush trim bit. For the most part this will give us an exact duplicate of the first side. Some sandpaper and elbow grease will finish off the rough edges.
Step 5: Assemble the wood using your specs that you outlined in step 2.
First up is drawing lines all over the sides to install cleats.
Pine cleats all cut to length and laid out and fastened to the sides. One note: We should have had the bottom cleat run all the way across, so the front and back cleats are supported by it, so keep that in mind if you try to build you own. The cleats are 3/4” wide and 1” deep.
Alright so time to drill some holes that will be used to attach all the other panels to the sides. 1. The cleats are all 3/4” wide and 1” deep, so I’ve drawn a line at 3/8” on the front panel to help me line up screws and also marked x’s where the nails are in the cleat Pro tip: you can get by with just a drill but having 2 makes less work. Also, if you can find a buddy to help, this would be the time.
Nail it all together! Be careful not to nail too hard, we made that mistake and caused one of our top boards to shift, it's a simple fix, but better to avoid if possible.
Step 6: The annoying part, putting the screen in.
Figuring out how to mount the screen is always the worst part of building a cabinet If your screen has a VESA mount that’s usually a good way to cheat. I don’t have that luxury here so it’s a lot of pondering and cursing and grabbing scraps of wood and cursing
Screen situation has been sorted. Or at least planned out. Cut down a 2x4 on either side to the exact thickness of the screen, and a scrap piece of 3/4” plywood bridging them to hold it in.
Notching out the bottom 2x4 allows better access to the screen ports.
Quick aside: A lot of woodworking tools are expensive and it’s tempting to just get a full set of something on amazon for the price of a single good thing But compare these two forstner bits. One cost $25 and the other came from a set of 16 that cost $20.
For the front of the screen, we need to cut a bezel. Here we have measured some guidelines, used a punch cutter for guildhold and will cut out the center of the board.
Install the bezel and look at that, it's starting to come together.
Step 7: Take a step back, look over your handy work. You may notice some problem areas: maybe a board isn't sitting flush against a cleat, maybe the screen bezel had rough edges, maybe a board shifted as you were nailing in other parts. Don't fret, this happens to all of us, and now is the time to make repairs and prep for the next step.
These edges were a bit rough, not to worry, some sandpaper helped smooth it out. Any problem can be solved with a combination of wood filler, sanding and time.
Step 8: Add on the back door, why a door? To make accessing the electronics you'll install later easier to access down the road. You never know when you may need to replace the screen, reboot the computer running your software or rewire a controller.
You can drill a 3/4” hole and drop in a lock, this one we're using has a lock nut on the back.
The door is installed! Hey, it looks legit now.
Step 9: Prep for paint! And paint!
By this point, your arcade is starting to look like an arcade. Your screen bezel, support brackets and screen is in place. Your panel for the speakers is all cut out as well. The only thing missing is the console (the part with the joysticks and buttons), and we'll be getting to that soon.
For now, it's time to give everything a final check, patch any areas, sand it smooth, make sure everything is sitting flush and secure.
We've put some primer on and now we wait to let it dry. The directions say to wait at least 4 hours, but just to be safe, we recommend giving it a full night. Also protip: make sure you sweep the area before starting, put some tarp down to keep it tidy and leave enough room to walk around it all freely.
In the morning, we started to apply our first coat of paint. You'll probably want to give it two coats in the end. You'll notice here some parts aren't painted, that's because those parts will be covered up, so why waste paint.
Fun fact: the color that were printing this cabinet is uhhhh *checks notes* San Francisco 49er red.
Step 10: While paint dries, prep the marquee.
You'll need 2 brackets, one of the top and one for the bottom edge of the marquee. These are simple aluminum ones, which you can find in any hardware store, just double check the length you need. We hit them with some primer as well and can paint them any color we want after.
The painted aluminum brackets look f'n doooooope! We settled on a brass color.
Marquee has been attached!
Step 11: Building the console portion. This section is where the bulk of your electronics will go and needs to be pretty study to withstand people pounding on it. Let's dive in.
Just like the cabinet, we start with draft drawing and then cut everything to our specs. The console is essentially a box, with cutouts for where buttons and joysticks will eventually go. Here’s the console for KungFu Kickball after we have made all our cuts and put it together.
Here it is after two coats of 49er red semi gloss.
And here with a fancy vinyl decal we had printed from @Varidirec
Used an exacto knife on the holes and installed buttons and cup holders.
Time to install the joysticks. We can either screw them in with super short wood screws from underneath, or put bolts through the top and affix them with nuts.
We decided we don’t want to ruin the slick look we have now with some bolts, so gotta make some spacer plates. Luckily we have a @glowforge to help.
Going to cut this out of wood with a hole in the center so it just adds an extra 1/4” of material to screw into.
Looks like we need two of them to get to 1/4” (only had 1/8” stock lying around).
Okay, everything fits! That took about 4 hours to install the joysticks and now onto wiring.
Step 12: Wire the console! Now we're nearing the end.
This guy is an iPac by Ultimarc. It maps joysticks and buttons to key presses. You can also use a Teensy microcontroller, but this guy just works out of the box and has a handy software mapping tool.
Up until this console I would have just soldered everything. This time I’m going for crimp connectors. I might change my mind though judging by how slow this is going.
Halfway done with crimping.
Finished wiring all the grounds. Now to test connectivity with a multimeter to make sure everything’s good.
Protip: Keep it tidy! Two essential tools for building anything: industrial Velcro and zip ties.
The finished wiring. Now all we need to do is put a hinge on this panel and then attach it to the rest of the console. So the result will be a console with a top that can be flipped up for quick repairs.
Step 13: This is the end my friends, we made it! Attach the console to the cabinet and power it up!
But wait, what about the game, right? These days, you can run a game off of anything from an old PC to a Raspberry Pi to something more custom.
For KungFu Kickball, we used a Windows PC and set the computer to run as an installation. Andy Wallace wrote up a nice blog about how to do that, basically the game is the "app."
Then we needed to set the buttons and joysticks to act as keyboard inputs. We downloaded the iPac software and use it to map all of these—for example, hitting the first button might translate to hitting "D" on a keyboard, the software acts as the bridge to translate the arcade button presses into keyboard letters, which the software on the PC then understands and executes.
Once all our buttons are mapped, we quickly test each button and joystick direction to make sure it's all good. Then, it's time to invite some friends over and throw a party.
Step 14: Enjoy!
Game on!
Curious to try KungFu Kickball for yourself? You're in luck! KungFu Kickball is currently at PAX East.
If you go, say hi to Jonah Wallerstein for us! If you can't make it to Boston, follow #kungfukickball on social.
Want to learn more? Your local library has many books on woodworking, electrical wiring and video game history, or, you can click right below for a few more resources from us:
If you enjoyed this, let us know what you'd like to see us breakdown next! Hit us up on social using #WondervilleNYC and we might do another post, or if there's enough demand, perhaps a class at Wonderville!
600 backers! 83%! 8 days to go! Let's do this!
about 7 years ago
– Mon, Mar 25, 2019 at 03:23:00 PM
Starting Monday off with a bang! 8 days left and we're at 83% of our goal, with a ton of rewards claimed—including one lucky person who is taking home a Line Wobbler! (Don't worry, there's still 2 left, don't delay, back that reward today!)
Upcoming events!
We're excited about a couple of events we have coming up, and we wanted to give you all the head's up first!
Tonight, at 10pm EST, Wonderville and Death By Audio Arcade founder Mark Kleeb will be appearing on The Geek Beat podcast! Mark will be talking about his long standing indie arcade project, the dev scene and this Kickstarter to create a new permanent residence for all the games created by Mark and the team over the last five years! Tune in!
And later in the week, on Friday at 6pm, we're all meeting IRL again, to play some games and raise a ruckus in Brooklyn! Greenpoint Elsewhere Loft is hosting a fundraiser for Wonderville and you're all invited! Did we mention it's free? It's free yo!
Hope to see you all there, we're nearly there and we owe it all to you!
Question for all our backers
We want you to be part of shaping Wonderville! So today, we're zeroing in on our workshops. We currently have rewards for a Modular Synth Workshop with Neil Sveri, Trig for Game Animation with Andy Wallace, Unity Workshop and Arduino Workshop with Mark Kleeb.
But we wanted to ask you, what other workshops would you like to see us hold at Wonderville? Want to learn how to cut wood and build an arcade cabinet? Interested in a romhacking class? Maybe a workshop on script writing for video games from a filmmaker? Let us know in the comments and on Twitter and Instagram using #WondervilleNYC!